This guide provides quick instructions so you can insert a table into Microsoft Excel without header rows.
You may be running into an issue and KNOW there’s probably a super simple solution, but just don’t know exactly where to look or what to use in Excel.
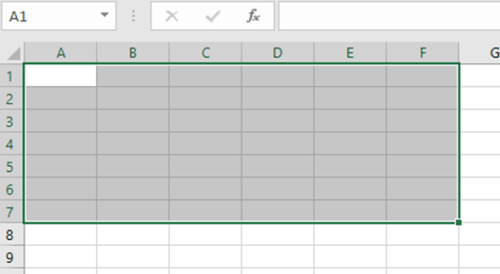
For example, you go to add a table in Excel that’s 5 across and 12 down. Every time you do it the header row with the columns label and drop-down arrows appear no matter what you do.
Continue with the guide below to insert a table without the header rows in Microsoft Excel.
Insert a table and remove header row – Simple steps
- Open Excel on your computer.
- Highlight the area / set of cells where you want to insert the table.
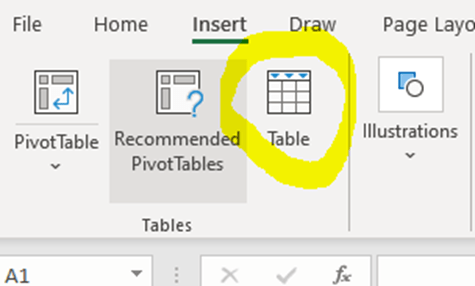
- Click Insert (at the top) then Table.
- Click OK when the Create Table popup appears.
- Darn – those pesky headers appear – however, you can make them disappear quick! Continue below.
- Click anywhere within the table.
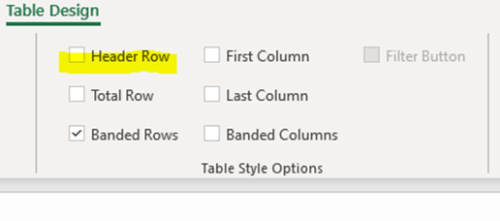
- Click the Table Design option that now appears in the top menu.
- Clear the checkbox for Header Row.
- Look at your table – the header row is now gone!
Insert a table and remove header row – Guide with images
1) Open Excel on your computer.
2) Highlight the area / set of cells where you want to insert the table.
3) Click Insert (at the top) then Table.
4) Click OK when the Create Table popup appears.

5) Darn – those pesky headers appear – however, you can make them disappear quick! Continue below.

6) Click anywhere within the table.

8) Clear the checkbox for Header Row.
9) Look at your table – the header row is now gone!
